Thursday, November 28, 2013

Why And How to Use Firebug,FirePath


Here we learn why and how to use Firebug and FirePath from Firefox........

1.Why we need this tools for Web Automation Using Selenium Web Driver ?

Web page object can refer to any of UI (User Interface) controls that exists in a particular web page. It can be a text, button, text box, drop down, radio button or any other UI elements.

Automation test scripts exploit UI elements to simulate any user interaction that can happen in that particular page. The interaction can be a type in text box, a click of a button, a select of a drop down or radio button and so on.

It is the responsibility of automation test developer to supply intended web objects for test scripts to perform any interaction what user expects to take on that page.

We take advantage of this tools to perform object identification in easier way.

When we proceed further we learn how to feed this object to Selenium Web Driver.

2.How we use this tools ?

Firebug :

A. Open Firebug

Start Firebug from Firefox Tools -> Web Developer -> Firebug ->Open Firebug or just press F12 or view -> Firebug or click on the bug sign on the Toolbar.

 Firebug will be opened and it shown below of the Firefox, it looks like this.....


B.Identify objects using Firebug

Firebug pane will be displayed with different internal representation of web page such as HTML, CSS, DOM and so on in which it is activated. The internal representation depicts the actual implementation of web elements (UI controls) that formed the web page on which firebug is mounted. Click on each tab in firebug to see implementation of page in HTML, CSS and DOM forms.

Click on inspect icon (next to bug icon in opened firebug) to identify any elements on web page.
Now click on the web element in page it will be highlighted in web page as shown below

 Or we can directly Inspect the web element just Right click on the web element and Choose Inspect Element With Firebug from the context menu.


FirePath :

 The FirePath allows the test developers to choose among XPath, CSS or SIzzle (JQuery) of web element  and it gives out object representation result in specified form after identifying it.

A. Open FirePath

  If FirePath is installed along with Firebug then FirePath tab should be visible on Firebug when it is opened.
B.Finding XPath Using FirPath

1.Open the Firebug.
2.Open the URL like www.google.com.
2.Navigate to the FirePath tab.

3.Click on the Inspect element button right hand side of the bug icon.....
4.Click on the web element like search text input box.
5.We see the XPath expression of this web element.
6.If we select CSS from the dropdown then we get the CSS path from it.


We will try to go deep on XPath  as well as finding and locate web element using different approach for Selenium Web Driver.


Wednesday, November 27, 2013

Install Firebug And FirePath on Firefox


In this post we learn how to add FireBug and FirePath Addons in FireFox. We know later why we need this add-ons for selenium webdriver on firefox.

Step 1:-Install Firebug

1.Open Firefox browser and go here.

2.Click on Install Firebug.

3.Click on Download link.Here one thing keep in mind that,install Firebug according to Firefox browser version.

4.It will redirect to Firefox add-on page (or it will redirect to the download index page if we try to download the older version) and click on Add to Firefox (or just click on the desired file if we redirected to the download index page).


5.Click on Allow.

6.Click on Install.

7.Now Firebug is installed, we find this on Firefox from Tools - > Web Developer -> Firebug.

If our machine don't have the internet connection then follow this steps.

  1. Click on here
  2. Open any indexes of version,here we want 1.6 like http://getfirebug.com/releases/firebug/1.6/
  3. Right click on any of the link and choose "save as"
  4. There will be one ".xpi" file which downloaded locally to ur computer.
  5. Copy that .xpi file and paste it in computer/server where internet connection was not available.
  6. Open File then select the addon.xpi file and click on Open or  In that PC/sever,open firefox-->go to tools -->add ons.Drag that copied .xpi file into add ons window
  7. Click on install.
  8. Restart firefox ur work is done. 
Step 2:-Install FirePath

Now we try to install the FirePath on FireFox . FirePath is an add-on to firebug (remember it is not add-on to firefox browser).

1.Open Firefox and go here.This will open Firefox add-on page.
2.Click on Add to Firefox.
 
3. Click on Allow.

4.Click on Install.

 Here this installation in Firefox may need to restart browser.

Monday, November 25, 2013

Selenium Web Driver Configuration With Eclipse


In previous post we configure Selenium Web Driver with NetBeans,here we try to configure Selenium Web driver with eclipse.

Step 1 - Download and install Java in your system .............

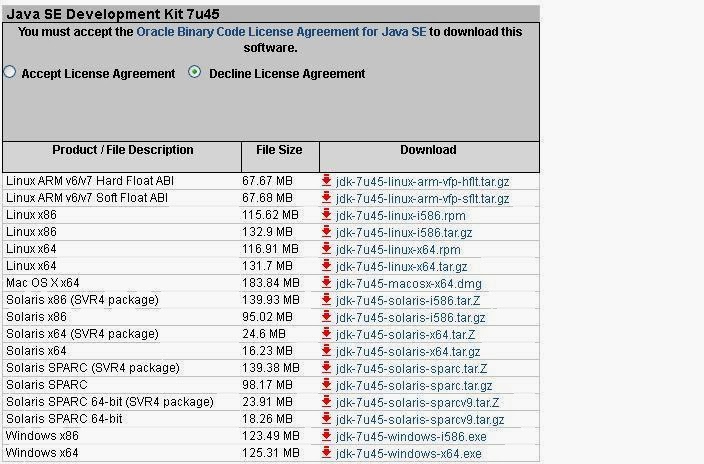
Download and Install JDK(Java Development Kit) from here .

JDK comes with JRE(Java Runtime Environment) so don't need to download it separately.Try to use new version of JDK.

Step 2 - Download and install Eclipse .............


Eclipse basically is an IDE(Integrated Development Environment). We use this to configure Selenium Web Driver to write code for an web automation. We download it from here as per our system configuration (Windows 32 or 64 bit). There are so many flavour of eclipse we prefer Eclipse standard or Eclipse IDE for JAVA Developers.

In Eclipse download page there are many types of package like Indigo,Juno Kepler etc this packages are nothing but a friendly name of the released version.

We always  try to use newer version of Eclipse.

Extract the zip file where you want after download was completed , you will find all application files will be contained with in eclipse folder.

Step 3 - Download Selenium Java Client  ............

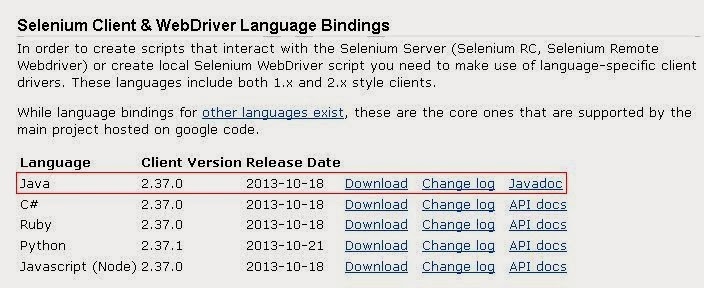
Download Selenium Client Driver from here .You will find client drivers for other languages there, but only choose the Java client (language-specific client driver's version is changing time to time so it may be different version when you will visit download page. )

After download completed extract the files from Selenium-Java-2.37.0.zip,it look like this

Open the the libs folder we can see more jar files are there like this........
Step 4 – Configure Eclipse IDE with WebDriver
Read more at http://www.guru99.com/installing-selenium-webdriver.html#U4aDyaTF0sS8XarQ.99

Step 4 - Configure Eclipse with selenium 2 (Web Driver) ..............
  • Select Workspace
We just need to double click on eclipse.exe which is with in the extracted eclipse folder IDE ,then start to work.We don't need to install this in our machine.It will ask to select workspace where our work will be stored as shown in below image.

 You can change it later on from 'Switch Workspace' under 'file' menu of eclipse.  
  • Create new project
Create new java project from File > New > Project > Java Project

 and give your project name like 'SeleniumWebdriverTest' as shown in bellow given figures.
Or you directly choose Java project from File > New > Java Project


  • Create new package
Right click on project name and select New > Package.

Give package name like  'mypackage' and click on finish button. It will add new package with name 'mypackage' under project name.

  • Create New Class
Right click on package 'mypackage' and select New > Class and set class name = 'MyClass'

and click on Finish button. It will add new class 'MyClass' under package 'mypackage'.Now eclips looks like that......
  • Add external jar file to java build path 
Now you need to add Selenium WebDriver jar files in to java build path. 
  1. Right click on project 'SeleniumWebDriverTest' > Select Properties
  2. Select Java build path > Navigate to Libraries tab 
  3. Click on add external JARs button > select all jar files(selenium-2.37.0 + selenium-java-2.37.0-srcs.jar +All jar in libs folder)
    4.Click OK.

    5.Now project looks like .......

Step 5 - Write A Simple Code ...............

1.Now we are ready to write code in Eclipse using Selenium WebDriver.Here we write some code like

package mypackage;

import org.openqa.selenium.WebDriver;
import org.openqa.selenium.firefox.FirefoxDriver;

public class MyClass {
   
    public static void main(String[] args) {
      
        //Here we initialize the firefox webdriver
        WebDriver firefoxDriver=new FirefoxDriver();
      
        //Open the url which we want in firefox
        firefoxDriver.get("Http://www.google.com");

    }
}
2.Run the test script by right clicking test script  > Choose Run As > Choose Java Application. Script can also be run by pressing Run icon available in menu bar......


after running the testscript firefox will be opened and show the google page like this....
If we observed the firefox window we can see that WebDriver word is written into the below of this page because it is opened by the Selenium WebDriver.


Friday, November 22, 2013

Selenium Web Driver Configuration With NetBeans

Here we try to configure Selenium Web Driver(Java Client) with Net Beans

Step 1 - Install Java And NetBeans In Machine  ............

Download and Install JDK(Java Development Kit) from here .


JDK comes with JRE(Java Runtime Environment) so don't need to download it separately.Try to use new version of JDK.

Download NetBeans from here and install it.We can download full package of NetBeans or only the Java SE NetBeans package.


We may download the combined package of JDK+NetBeans from here and installed the combined package.Using this we don't need to install JDK and NetBeans separately.


NetBeans is just an editor, we may also use Eclipse as an editor. In another post we can see how to configure Eclipse for Selenium WebDriver.


Step 2 - Download Selenium Java Client  ............

Download Selenium Client Driver from here .You will find client drivers for other languages there, but only choose the Java client.
After download completed extract the files from Selenium-Java-2.37.0.zip,it look like this

Open the the libs folder we can see more jar files are there like this........


Step 3 - Configure NetBeans IDE With Selenium WebDriver  ............

1.Open NetBeans IDE.
2.Goto File->New Project->Categories Java and Projects Java Application and click next.
3.Give the Project Name and Destination where it it will be saved and click finished.

  4.Right Click on project which is shown on the left side of NetBeans and select Properties.......
5.Add all jars with in the selenium-2.37.0 folder (selenium-2.37.0 + selenium-java-2.37.0-srcs.jar +All jar in libs folder)......
6.After adding the all jar this should be shown on the NetBeans.....
7.Now we are ready to write code in NetBeans using Selenium WebDriver.Here we write some code like

/*
 * To change this template, choose Tools | Templates
 * and open the template in the editor.
 */
package SeleniumWebDriverEx1;

import org.openqa.selenium.WebDriver;
import org.openqa.selenium.firefox.FirefoxDriver;

/**
 *
 * @author
 */
public class SeleniumWebDriverEx1 {

    /**
     * @param args the command line arguments
     */
    public static void main(String[] args) {
        // TODO code application logic here
      
        //Here we initialize the firefox webdriver
        WebDriver firefoxDriver=new FirefoxDriver();
      
        //Open the url which we want in firefox
        firefoxDriver.get("Http://www.google.com");


    }
}


8.We run the project then firefox will be opened and show the google page like this
If we observed the firefox window we can see that WebDriver word is written into the below of this page because it is opened by the Selenium WebDriver.


Step 1 – Install Java on your computer
Read more at http://www.guru99.com/installing-selenium-webdriver.html#7HRV5yfx1bvgAC6G.99
Step 1 – Install Java on your computer
Read more at http://www.guru99.com/installing-selenium-webdriver.html#7HRV5yfx1bvgAC6G.99
Step 1 – Install Java on your computer
Read more at http://www.guru99.com/installing-selenium-webdriver.html#7HRV5yfx1bvgAC6G.99
Step 1 – Install Java on your computer
Read more at http://www.guru99.com/installing-selenium-webdriver.html#7HRV5yfx1bvgAC6G.99
Step 1 – Install Java on your computer
Read more at http://www.guru99.com/installing-selenium-webdriver.html#7HRV5yfx1bvgAC6G.99